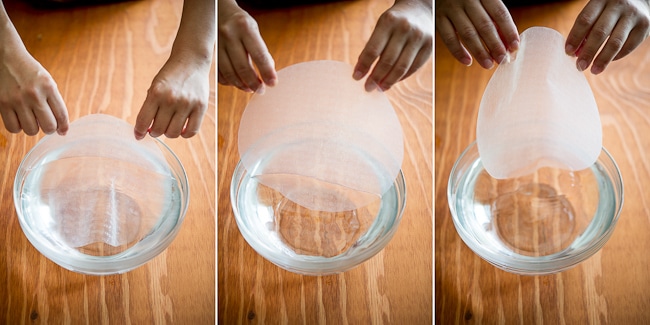
Start with a large bowl of warm water, about bath water temperature. Rotate the rice paper in the bowl of water or quickly immerse it in the bowl for about 2 seconds.
***********
The rice paper should come out of the water still slightly firm and not fully folding on itself. Don’t worry if the rice paper might feel a little firm because once the rice paper lays on the rolling surface, it will continue to absorb the water on its surface and will become soft and GELATINOUS. Lay wet rice paper on rolling surface. Just a note:some wood surfaces are very porous and will cause the rice paper to stick terribly. If this is the case with your wood board, try using a plastic cutting board or large ceramic plate.
**********
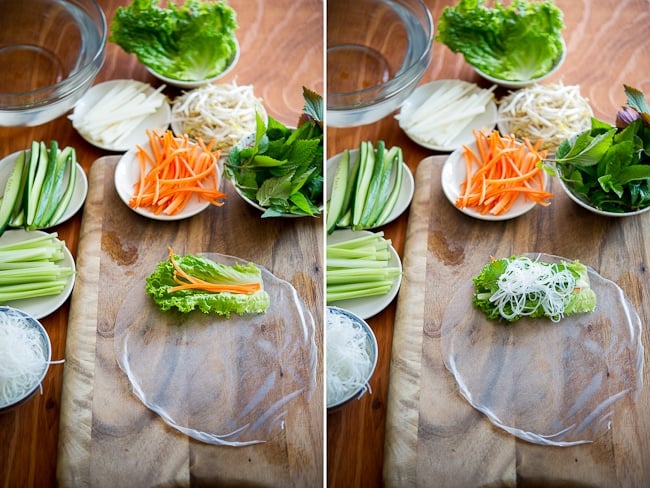
Again, mise-en-place organization is very important. Lay down slightly firm rice paper on your rolling board and start assembling ingredients. During the time that you’ve assembled ingredients, the rice paper will become soft and gelatinous.
**************************
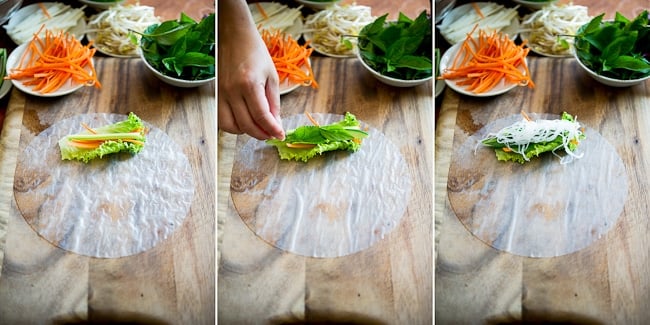
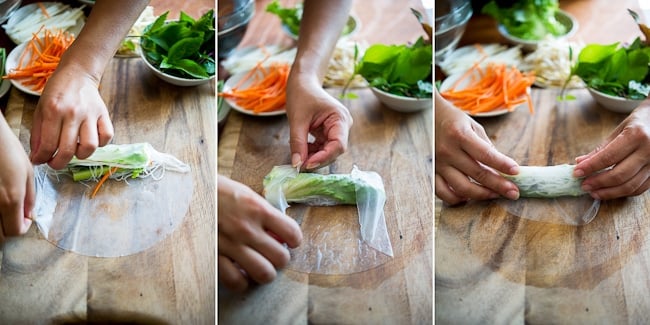
Starting at top 1/3 of rice paper closest to you, lay lettuce first. I suggest this because this will avoid any sharp fillings to tear the soft rice paper. Make sure to lay the rice paper at the top 1/3 so that you have plenty of surface area left to roll. The more rotations of rice paper you have, the stronger the rice paper will be and less likely to puncture. Do not over-stuff your roll, start small then continue to add more fillings that works with your size rice paper.
*******************************
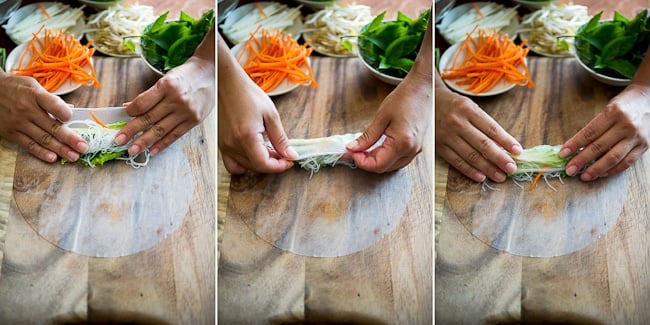
“Tuck and Roll”- This is a term we teach in our spring rolls classes. You want to have a firm roll.
Gently pull away the edge of wrapper from work surface and roll over the filling. At the same time, use your forefingers to gather and “tuck” fillings together under the wrapper. “Tucking” allows you to keep all filings together and tight, so that the roll remains firm and straight.
Slowly start to roll away from you and “tuck” in your filling toward you to keep the roll tight. ** Notice my fingers and how I use them to keep the fillings together and tight.
*****************
Roll about one rotation, then fold in the sides for “closed end” spring rolls. Continue to roll till rice paper ends, but remember to “tucking” ingredients together with your fingers.
** I will have a tutorial for rolling “open end” spring rolls later.
***************
Serving and storing- Eating these fresh as you roll them is best. The rice paper is soft and pliable and the spring roll is plump.
To store them, you can wrap them in plastic cling wrap for about 1-2 hours in a cool area before serving. But if you have perishable proteins like seafood and other meats, then you must store them in the fridge. The rice paper will get hard and possibly crack if you store the in the fridge for more than about 5 hours.
*** Note that storing the spring rolls stacked or side-by-side may cause spring rolls to stick and tear when separated. What I will do is to layer each row of spring rolls with plastic cling wrap so that the spring rolls are not touching.
*** For a few spring rolls for lunch, I will wrap each spring roll individually so that they remain fresh and won’t stick.
If you have any further questions, just ask below! But please read my tutorial first to make sure I haven’t answered it yet.
Have fun spring rolling!


