Showing posts with label post by Lily. Show all posts

Tuesday, 13 August 2013

Chineses traditional dampling

Chinese dampling is one of the popular traditional. Since ancient age, King of China used to make or to eat dampling in New Year, it is simple for cook,but complicate for making it when you want to mix more favours.
The follow will teach you how to make the delicious dampling ~~~


  1. 1
    Shred the cabbage and put into a stainless pot.

  2. 2
    Mix the cabbage and minced meat together by hand ( suggestion). Ground meat is meat finely chopped by a meat grinder. Pork is generally preferred for Chinese dumplings, but beef, chicken, and turkey also will be possible^^.( depend personal hobbit
    The process of mincing is usually done manually.

  3. 3
    Add the balm, salt and a little tai bai fen (cornstarch/cornflour) and mix again.

  4. 4
    Massage the cabbage mixture with your hand for few minutes. to make it dry. if you feel that there is not enough tai bai fen, you should add more.

  5. 5
    Put the mixture on the wrapping,( it is possible to find in major chinese retails which also call is as skins) . These wrappers, which are Chinese in origin, are suitable for boiling, steaming, deep-frying, and pan-frying. You can also make your own.

  6. 6
    Wet the edge with a damp finger and fold the sides together, crimping (pressing together) with your fingers to seal the contents inside. .

  7. 7
    Wrap the crusts up as in the picture below.

  8. 8
    Put the dumplings in boiling water. To make sure that they are thoroughly cooked, one method in China is the "3 boil" method: Add the dumplings to boiling water + salt, and return the water to a boil. Then add 1 or 2 cups of water (cold or room temp). Wait for it to boil the second time, then add water again. After the water boils the third time, it's done!

  9. 9
    Transfer the dumplings carefully from the pot to a plate and enjoy.


enjoy you dampling with your family ^^ hope you like
Post by Lily

Monday, 5 August 2013

Sushi


  1. Sushi

    Select 2 types of veggies (cucumbers and carrots) and a fish (for instance artificial cooked crab). Also, buy some dried seaweed (also known as nori) and uncooked rice.

  2. 2
    Place about 2 cups of sushi rice in a rice cooker and then rinse the rice repeatedly until the rice water is not cloudy. Then fill the rice pot with new water (how much water depends on the amount of rice of the cooker and the same goes for how long to cook it; the instructions are usually in the box).

  3. 3
    Wash the veggies and place them on a cutting board and cut the carrots in half long wise and then cut them into long skinny strips. Repeat on the cucumber.

  4. 4
    Cut the crab into little strips and make sure they are pretty even in length.

  5. 5
    Check on your rice. If it's ready, take it out and put it in a dish.

  6. 6
    Take a bowl and pour in about two tablespoons of rice wine vinegar. You can add more or less depends on your taste buds and how separated you want your grains or rice. It is better to put in less right now and add more later. Add in sugar and salt and stir until it dissolves (repeat until it tastes good).

  7. 7
    Pour the mixture onto the rice and mix thoroughly by "slicing" the rice. Add rice wine vinegar if needed to make the grains of rice separate easily.

  8. 8
    Place the seaweed layer on a bamboo mat and then spread rice onto the seaweed. It should be spread out so there are no empty holes and it should fill the middle third. Dampen the end edge with rice vinegar so it sticks when you roll it. Place the strips of the veggies and the crab onto rice.

  9. 9
    Roll the bamboo into a long roll by first folding the bottom third in then roll it up. It should look like a tube of some sort. Now remove the sushi roll from the bamboo and cut out as follows.

  10. 10
    Cut down the middle of the roll, take each half and place them parallel to each other. Repeat by cutting both halves down the middle simultaneously, take those portions and repeat one last time. This cutting technique insures that the ingredients do not spill out of the roll.

  11. 11
    Serve and enjoy!


post by Lily

Tuesday, 30 July 2013

Vietnam spring roll


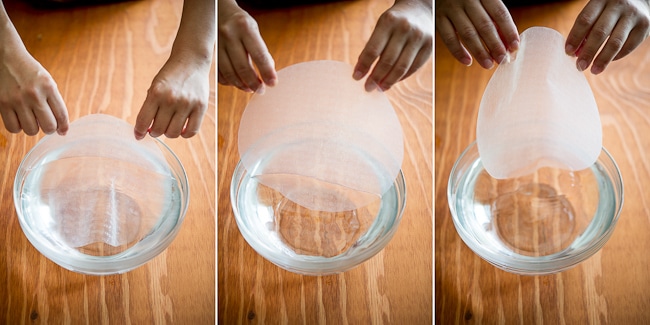
Dip the Rice Paper in warm water.
 
Rice paper is delicate and only needs a quick dip in warm water to soften. Do not “soak” the rice paper for too long because it will break down too quickly, making the rolling more difficult to roll.
Start with a large bowl of warm water, about bath water temperature. Rotate the rice paper in the bowl of water or quickly immerse it in the bowl for about 2 seconds.
***********
The rice paper should come out of the water still slightly firm and not fully folding on itself. Don’t worry if the rice paper might feel a little firm because once the rice paper lays on the rolling surface, it will continue to absorb the water on its surface and will become soft and GELATINOUS.  Lay wet rice paper on rolling surface. Just a note:some wood surfaces are very porous and will cause the rice paper to stick terribly. If this is the case with your wood board, try using  a plastic cutting board or large ceramic plate.
**********
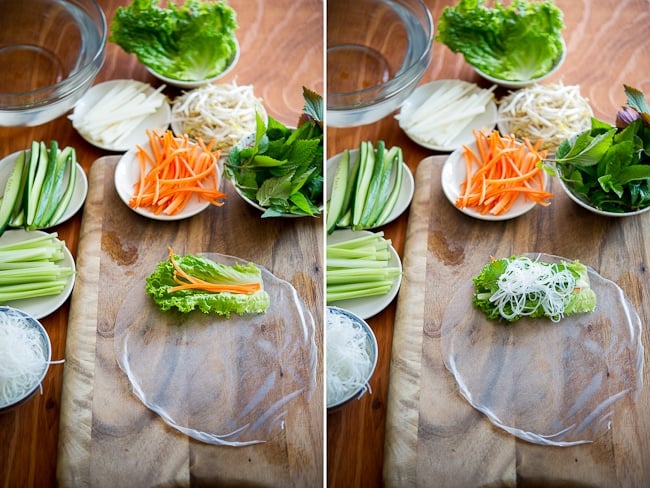
Again, mise-en-place organization is very important. Lay down slightly firm rice paper on your rolling board and start assembling ingredients. During the time that you’ve assembled ingredients, the rice paper will become soft and gelatinous.
**************************
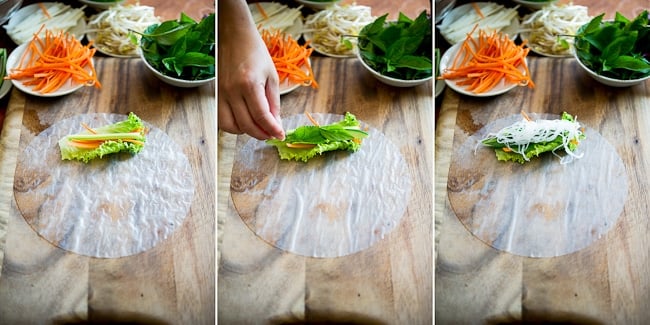
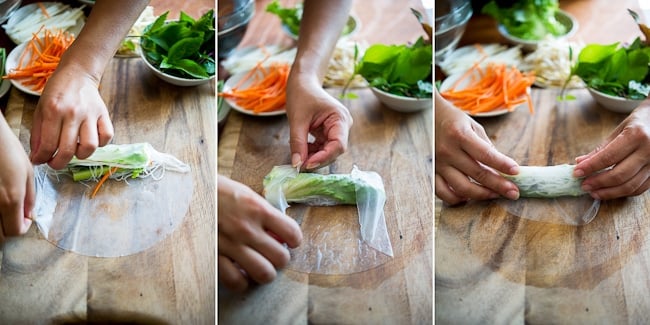
Starting at top 1/3 of rice paper closest to you, lay lettuce first. I suggest this because this will avoid any sharp fillings to tear the soft rice paper. Make sure to lay the rice paper at the top 1/3 so that you have plenty of surface area left to roll. The more rotations of rice paper you have, the stronger the rice paper will be and less likely to puncture. Do not over-stuff your roll, start small then continue to add more fillings that works with your size rice paper.
*******************************
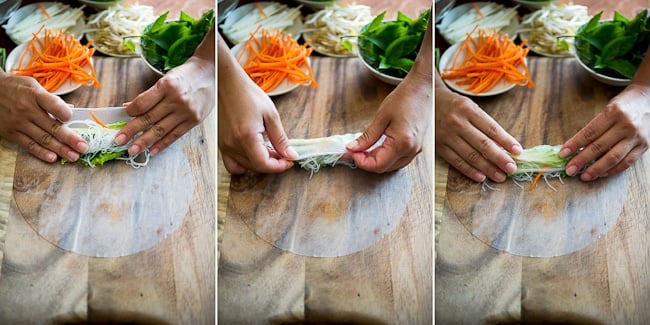
“Tuck and Roll”- This is a term we teach in our spring rolls classes. You want to have a firm roll.
Gently pull away the edge of wrapper from work surface and roll over the filling. At the same time, use your forefingers to gather and “tuck” fillings together under the wrapper. “Tucking” allows  you to keep all filings together and tight, so that the roll remains firm and straight.
Slowly start to roll away from you and “tuck” in your filling toward you to keep the roll tight. ** Notice my fingers and how I use them to keep the fillings together and tight.
*****************
Roll about one rotation, then fold in the sides for “closed end” spring rolls. Continue to roll till rice paper ends, but remember to “tucking” ingredients together with your fingers.
** I will have a tutorial for rolling “open end” spring rolls later.
***************
Serving and storing- Eating these fresh as you roll them is best. The rice paper is soft and pliable and the spring roll is plump.
To store them, you can wrap them in plastic cling wrap for about 1-2 hours in a cool area before serving. But if you have perishable proteins like seafood and other meats, then you must store them in the fridge. The rice paper will get hard and possibly crack if you store the in the fridge for more than about 5 hours.
*** Note that storing the spring rolls stacked or side-by-side may cause spring rolls to stick and tear when separated. What I will do is to layer each row of spring rolls with plastic cling wrap so that the spring rolls are not touching.
*** For a few spring rolls for lunch, I will wrap each spring roll individually so that they remain fresh and won’t stick.
If you have any further questions, just ask below! But please read my tutorial first to make sure I haven’t answered it yet.
Have fun spring rolling!